

5 Smart Routing Modes For an Efficient Live Chat Distribution
Chat service routing shouldn't be a roulette. You want your customers to be connected to the Operator that's best-suited to solve their issue. No waiting time, no forwarding.
Being forwarded is one of the biggest annoyances in customer service. That’s why a smart routing logic is crucial for an efficient and satisfactory setup. Live chat is the perfect channel for this. In contrast to phone, you have some nice tools at hand that deal with routing more elegantly than an options menu: “If you want to talk to Sales, press 1...”
Here are our routing modes, so you can tailor your chat distribution to your team’s needs.
1
Default
The Default routing mode is simple. With Userlike, every Chat Widget is connected to a specific Operator Group. When your web visitor starts a chat through a Chat Widget, she's connected to one of the available Operators of this group.
If no Operators are available, the Widget falls back to its configured offline mode, e.g. the offline form or Chat Butler.
The Default routing mode is a good match...
- when you’re starting out with a small chat team or are mostly getting similar questions.
- when all your Operators are able to give the same quality of support throughout all areas.
- when you’re already routing web visitors to specialized Operator Groups through different Widgets on certain parts of your website. For example, (1) a Sales Operator Group that’s connected to a Widget integrated on your Pricing page and (2) a Support Operator Group that’s connected to a Widget integrated on your other landing pages.
Free Guide to Professional Communication in Customer Support
Download our free guide and master professional customer communication across channels: e-mail, phone, and live chat.
Get your guideHow to set it up
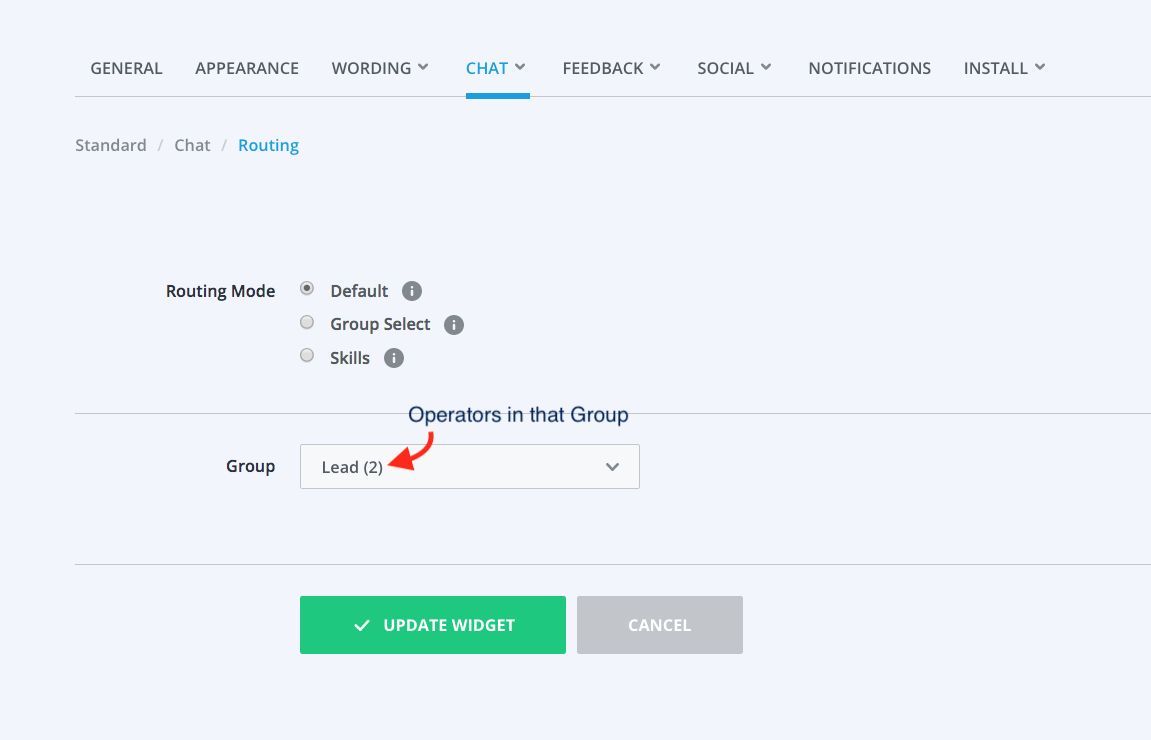
As the name indicates, the Default mode is the standard setting. To change it, enter your Widget's settings , then go to "Chat" > "Routing". If you want to stick with or switch back to Default mode, make sure that the Operator Group connected to your Widget contains at least one Operator.
2
Group Select
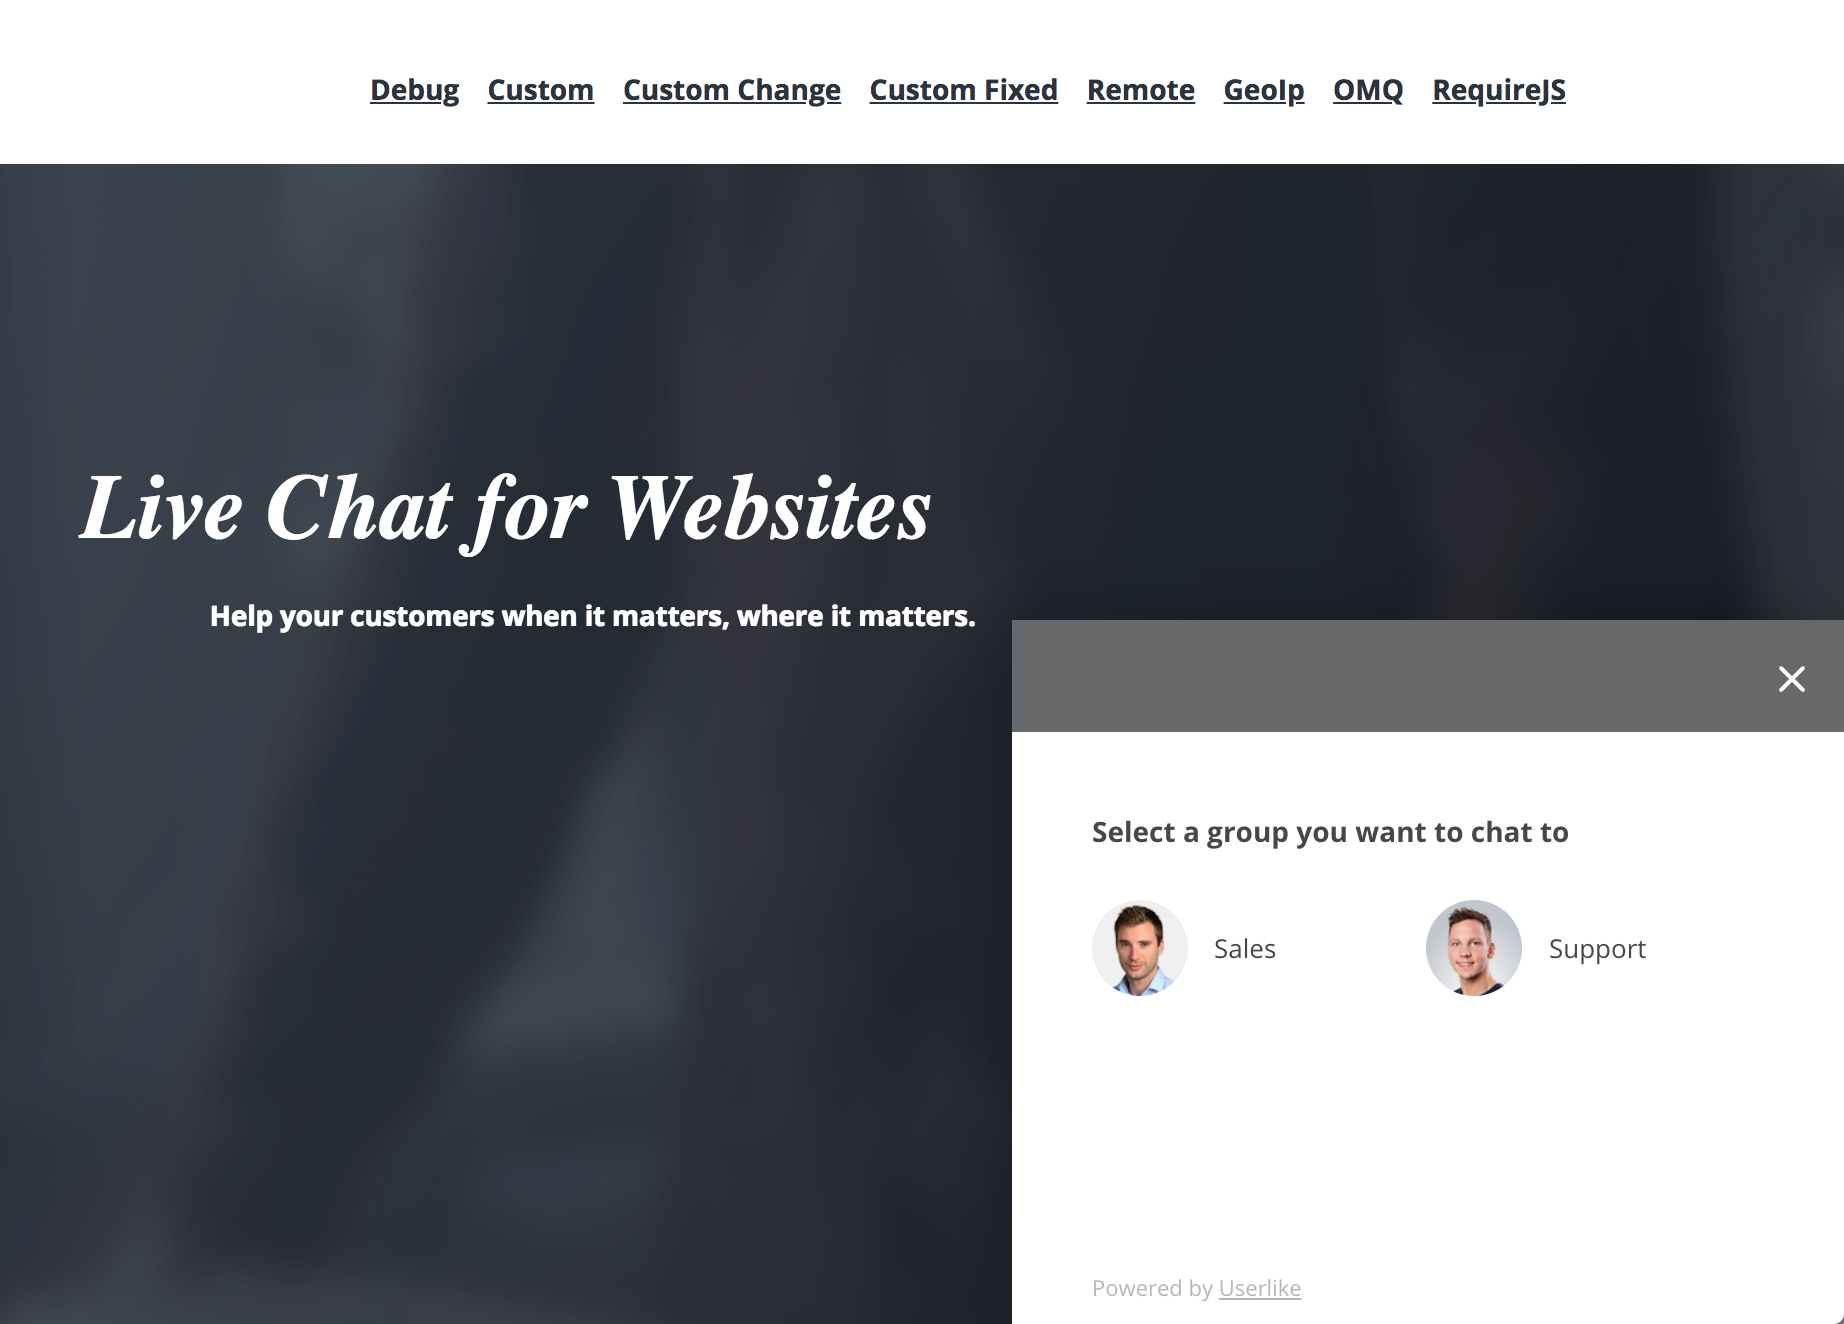
Your Chat Widgets are connected to a default Operator Group. But if you enable Group Select, you can also interlink additional groups. You leave the choice to your web visitors here, so they can pick the right group before starting the chat. That way, your visitors can be sure to talk to someone that is best-suited to help them.
They’ll only see this option if Operators from these groups are online. Otherwise, the setup falls back to the Default mode.
The Group Select routing mode is a good match...
- when you have a large chat team with specialized Operators and want to let your web visitors decide which department to talk to. This can be helpful, for example, when you run a site that's visited by people speaking different languages . Instead of presuming their language preference, you can use Group Select to leave the choice to them.
- when you have a small chat team in which your Operators with different specialities can cover for each other. By setting the mode to Group Select, your web visitors can still reach somebody from your team even when their preferred Group is unavailable.
How to set it up
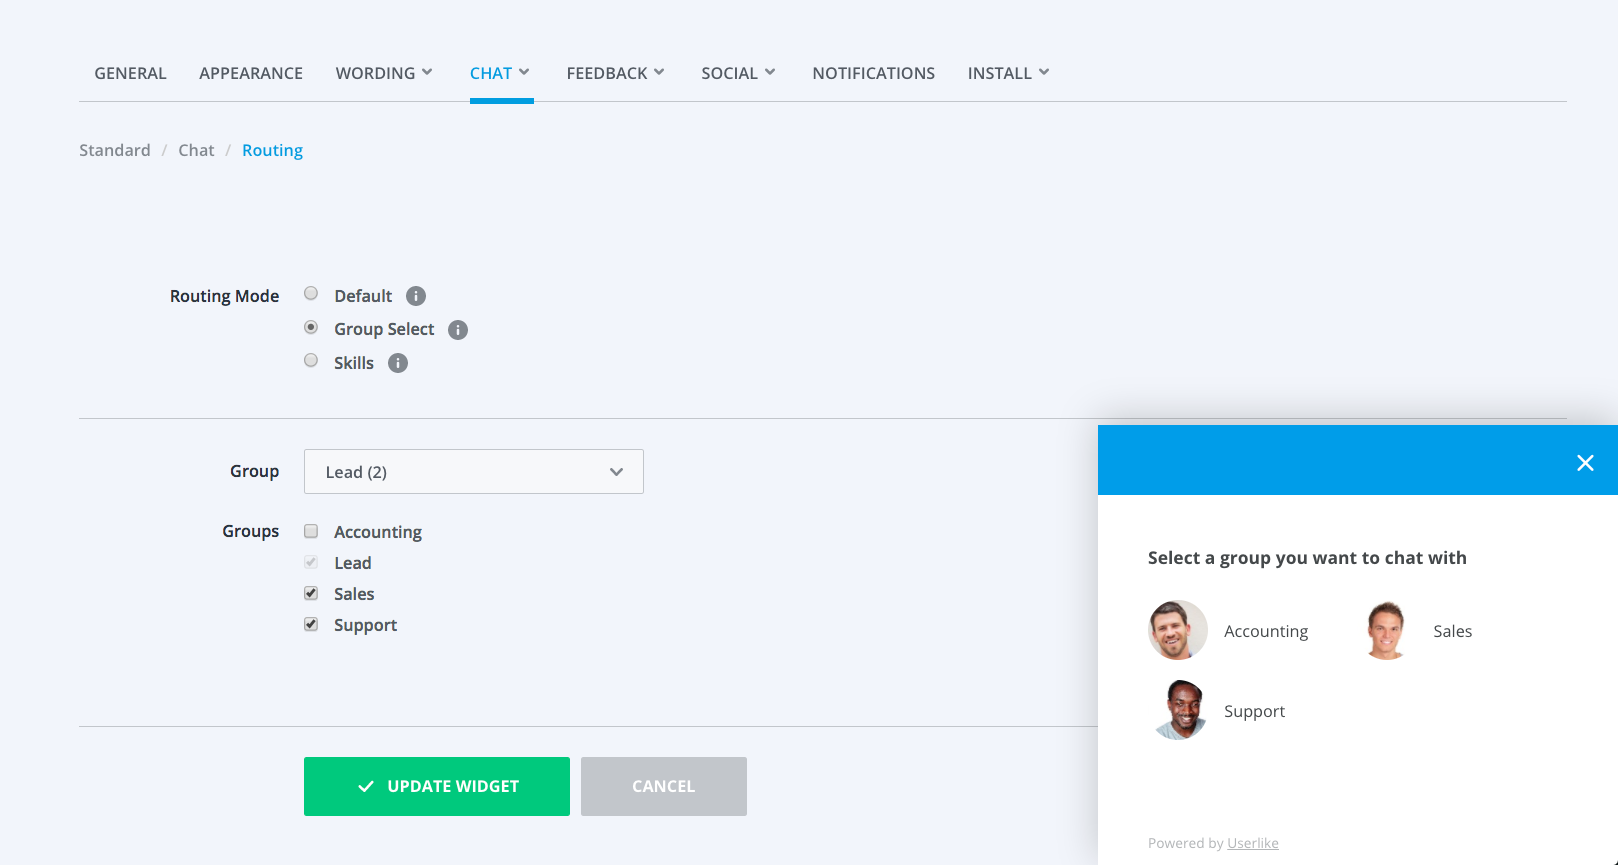
As with the Default mode, enter your Widget's settings , then go to "Chat" > "Routing".
Set the "Routing Mode" to "Group Select". Additionally to your Chat Widget's default Group, you can select all other Operator Groups the web visitor should be able to choose from when she’s connected with this Widget. Remember that you can only select Operator Groups that have at least one Operator.
3
Skills
Skills is our most flexible routing mode. You define abilities and assign them to your Operators and Chat Widgets. When a visitor starts a chat on a specific Widget, she’s guided to an Operator who possesses the Skills defined for it, no matter their Group affiliation.
Looking for better customer relationships?
Test Userlike for free and chat with your customers on your website, Facebook Messenger, and Telegram.
Read moreYour visitors don’t have to take an extra step here, so you can be sure they’ll always be connected with someone who is able to help them.
This mode is a bit more complex than the others. Take a look at our dedicated Skills post to get some hands-on example scenarios and best practices.
The Skills routing mode is a good match...
- when you have a large chat team with many different capabilities. Instead of creating a fixed structure with Operator Groups which you’d connect permanently to a Chat Widget, you can precisely describe which Skills an Operator has to possess for each Widget.
- anytime you wish you could put an Operator into two different Operator Groups. When you have a smaller team, for example, and want your Sales and Support staff to handle some of the general requests while still being available for their speciality topics.
How to set it up
- Define your Skills , for example, “English”, “German”, “Support”, “Sales”, “Product X”, “Product Y”
- Assign Skills to your Operators , for example, Peter (“German”, “Support”, “Product X”), John (“English”, “Support”, “Product X”), Angela (“English”, “Sales”, “Product Y”)
- Assign Skill Sets to your Chat Widgets , for example, to the “DE-X Widget”, you would assign the Skills “German” and “Product X”
10 Operators is the point at which significant differences in your Operators’ specialities will start to develop, which is why the Skills feature is included from our Business Plan on.
Check out the video below to see the different routing options in action as well as step-by-step instructions on how to set them up:
4
Chatbot routing
The routing options described above are great if you have a (bigger) team and want to ensure you’re connecting your web visitors with the best-suited Operator. But what if you don’t have a dedicated, fully staffed support team and can’t be online in the Chat Panel all the time? What if you do have to put your web visitor in a queue sometimes?
Just have your robotic sidekick Chat Butler take over! Chat Butler is a simple chatbot that automatically responds to chat requests when no Operator can immediately be available.
Though it isn't technically one of our ‘real’ routing modes, it still works like one. If you have Chat Butler enabled and no Operator is online, your web visitors get connected with Chat Butler, who gathers their questions and notifies your service team of the chat via Slack or email. The chat is then routed to the first Operator that replies to Chat Butler’s call.
The Chat Butler routing is a good match...
- when you have a small chat team and can’t always be online in the Chat Panel during your service times.
- when you want to put your visitors in a queue, notify all Operators of the incoming chat, and let them decide who should answer the chat. The fact that multiple people see the notification strongly reduces the chance that a chat gets missed.
How to set it up
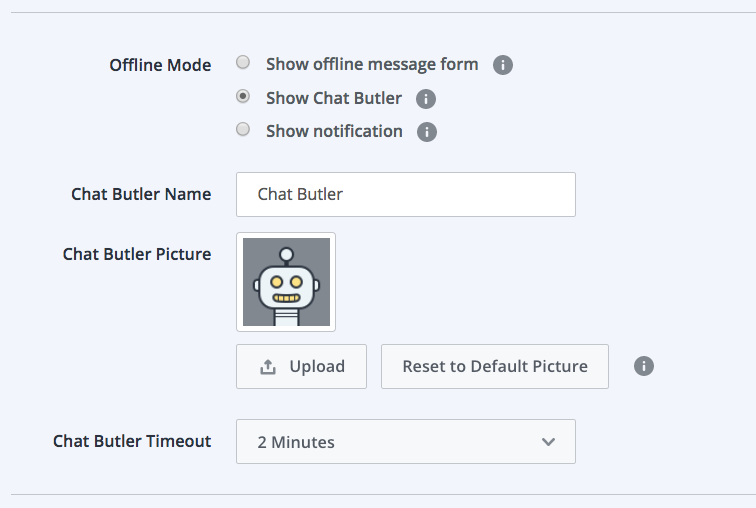
Setting up Chat Butler is easy. Go to the Dashboard and select “Config” > “Widgets”. Select your Widget, then head to “Chat” > “Behavior”. Set your service times during which you’d want the Chat Butler to appear.
Just below, under your Offline Mode options, you can select “Show Chat Butler” to reveal more options. You can give it a unique name, upload a picture, and set its timeout. This will determine how long the Chat Butler will search for an available Operator before creating an offline message.
You can use Chat Butler in all of our Premium plans .
5
Internal routing
You can control which routing mode you want to use. But what if all else is equal? Beyond the routing mode, the chat distribution isn’t random either but follows a smart ‘internal routing' logic.
If multiple Operators are online, what determines which Operator will receive the next chat?
This logic represents what we believe good live chat service should be like: fast, efficient, and personal. Regardless the routing mode – if several Operators (with the same capabilities) are online, the following set of rules governs who will get the chat.
-
The Operator with the former connection.
Userlike is a solution that helps forge long-term customer relationships. But building such a relationship with your visitors and offering efficient support is hard when they’ll get connected to a different Operator every time they enter the chat.
That’s why we have this golden standard for chat visitor routing: if the web visitor has been in the chat before and the same Operator happens to be online, she will be routed to that Operator again. It’s our most important rule that trumps the other ones. -
The Operator with most available chat slots.
If your web visitor hasn’t been in the chat before, she’ll be directed to the Operator with the most available chat slots. This rule is supposed to both balance the workload between your Operators and minimize the response time for your visitors.
You can have a maximum of 10 chat slots, but we recommend to start with a number of 3. Note that adjusting your amount of chat slots downwards for a specific Operator will reduce her chances for receiving the next chat.
However, you can also implement this into your support workflow and have your (more experienced) Operators with many chat slots receive the bulk of the chats while others with fewer slots only come in when the chat load gets too high. -
The Operator with the longest idle time.
The third and last routing rule that applies. Considering the web visitor hasn’t been in the chat before and all Operators have the same amount of available chat slots, the Operator that hasn’t had a chat for the longest time will receive the next chat.
Don't have a Userlike account yet? Get started with a free 14-day trial!
